Prompt-to-Pivot: Building WebDataRocks Report Inside Claude
In this article
We’ll show you how to go from a simple prompt to a working WebDataRocks pivot table, exploring different layouts, calculated values, formatting, and themes — all without setting up a project first.
Lately, LLMs have advanced to the point where they can not only answer questions or write code but also build working interfaces. This makes them a handy place to quickly test ideas for reports and data analysis. Instead of starting with a project and writing the code yourself, you can start with a simple prompt in your AI assistant. For example, you can ask it to build an interactive WebDataRocks pivot table right in the chat.
WebDataRocks is a free JavaScript pivot table built for exactly this kind of quick reporting job. It’s simple enough for an AI assistant to set up from one prompt and free, so you can seamlessly experiment and try out your ideas. Describe the report you want, and Claude hands back a working, interactive grid in the same message.
Here we’ll show how to build one using made-up coffee shop sales data. Step by step, with copy-paste prompts that you can use as a base for your own projects.
Why this is worth doing before you write any real code
Analysts and developers use pivot tables for the same reason: to see how a metric breaks down across two or three dimensions without writing a query for every combination. Normally, that means opening a project, wiring up a data source, and configuring the grid by hand.
Skipping straight to a chat window compresses that into a conversation. You’re not shipping anything, you’re checking whether a particular row/column split tells you what you think it will, or showing a colleague a rough mockup of “what if we grouped by store type instead.” Once the shape is right, translating it into a real WebDataRocks integration is copy-paste work, because the report configuration object is identical either way.
One setup detail to keep in mind
WebDataRocks’ documentation points you to cdn.webdatarocks.com by default. That domain won’t load inside most of AI assistants’ preview pane — each of these environments only executes scripts pulled from a short allowlist of public CDNs, and WebDataRocks’ own domain isn’t on it. So, in this tutorial we’ll use WebDataRocks files from jsDelivr instead.
Step 1: Describe the data and the first slice in one go
Rather than asking for the library first and the data second, put everything in one message — the field list, the row/column split, and the measure. That’s the fastest way to a usable result on the first try.
Build an interactive WebDataRocks pivot table in the Claude artifact.
Load the library from jsDelivr: CSS from
"https://cdn.jsdelivr.net/npm/webdatarocks/webdatarocks.min.css",
and the core script from
"https://cdn.jsdelivr.net/npm/webdatarocks/webdatarocks.js".
Generate 80 records of coffee shop sales as a JSON array with fields:
City, Store Format, Product Category, Units Sold, Revenue in USD, Month.
Configure the report:
rows = City,
Store Format;
columns = Product Category;
measure = sum of Revenue.
Enable the toolbar.
Set the container height to 520px.
What comes back is a built-in pivot table already sliced: city and store format down the rows, product category across the top, revenue totals filling the cells.
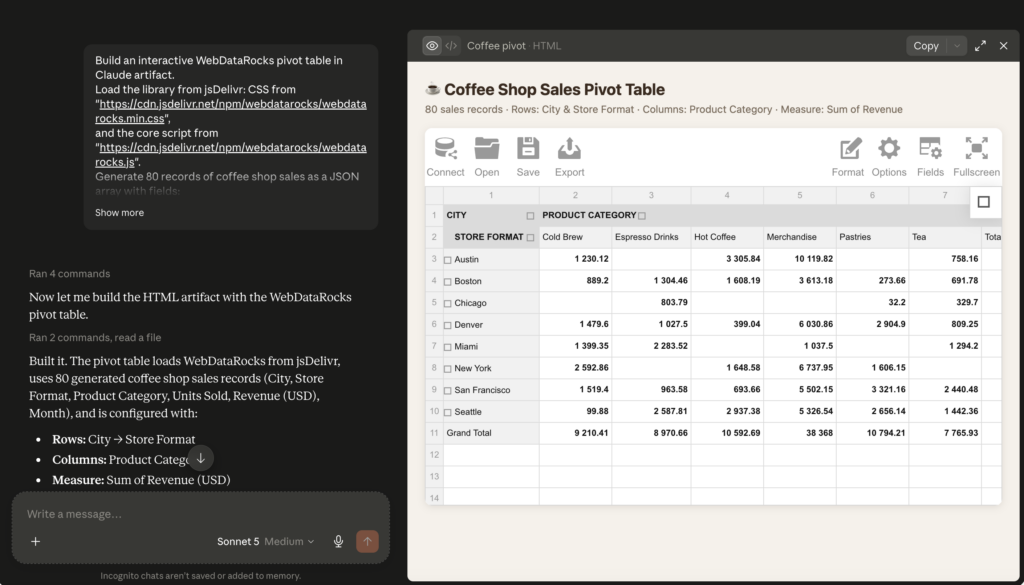
One prompt, one working report. The only real work was clearly describing the fields and the slice. Also, if it’s more convenient, you can split it into different prompts and watch your grid creation gradually.
Step 2: Change the slice without losing the data
Here’s a mistake worth avoiding: asking for a fresh pivot table every time you want a different view. That regenerates the underlying dataset, too, so your numbers change between screenshots, and nothing stays comparable. Moreover, it wastes many more of your generating tokens.
Instead, refer back to what’s already there:
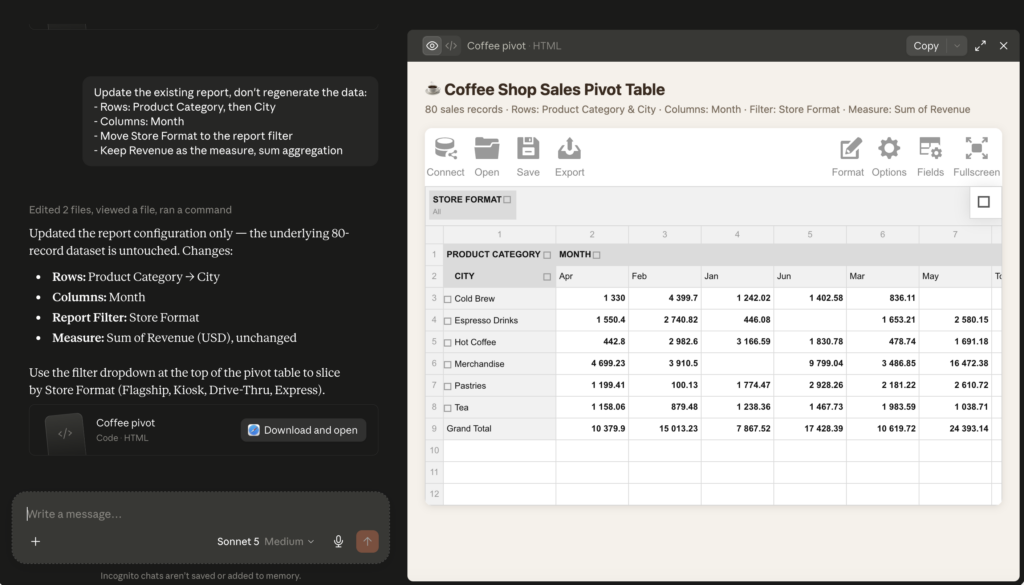
Update the existing report, don't regenerate the data:
- Rows: Product Category, then City
- Columns: Month
- Move Store Format to the report filter
- Keep Revenue as the measure, sum aggregation
WebDataRocks keeps the entire layout: rows, columns, filters, measures, in a single report object, so this kind of request is edited rather than rebuilt. Same 80 records, but new angle on them.
Step 3: Layer on a calculated metric and some formatting rules
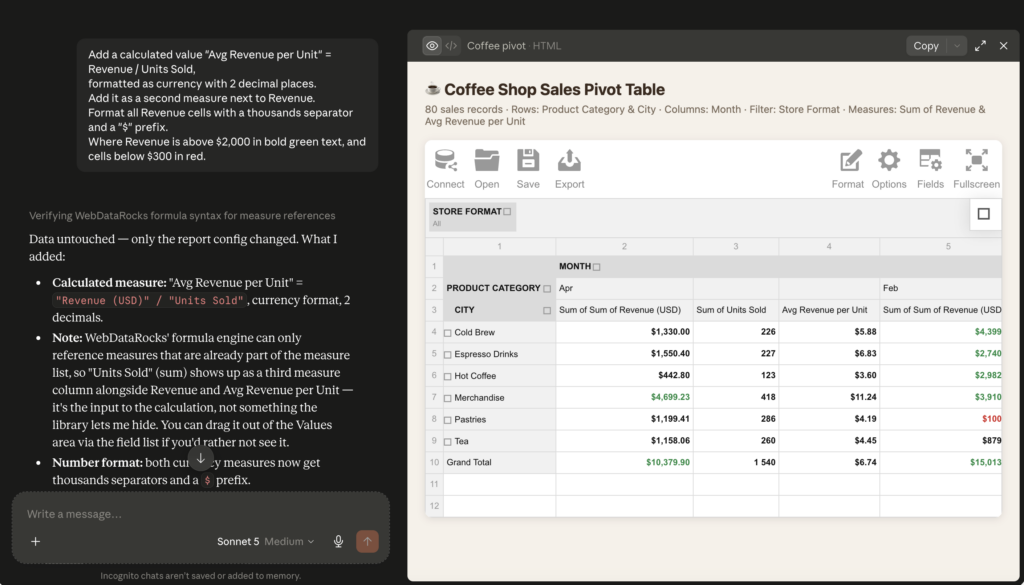
Once the slice looks exactly as you expect, it’s possible to try a calculated value too, something that isn’t in the raw data at all.
Add a calculated value "Avg Revenue per Unit" = Revenue / Units Sold,
formatted as currency with 2 decimal places.
Add it as a second measure next to Revenue.
Format all Revenue cells with a thousands separator and a "$" prefix.
Where Revenue is above $2,000 in bold green text, and cells below $300 in red.
Mentioning a function name or a syntax detail isn’t necessary at all. You can describe the outcome you want, and Claude picks the matching WebDataRocks option or callback on its own.
Step 4: Try a different look or a different source
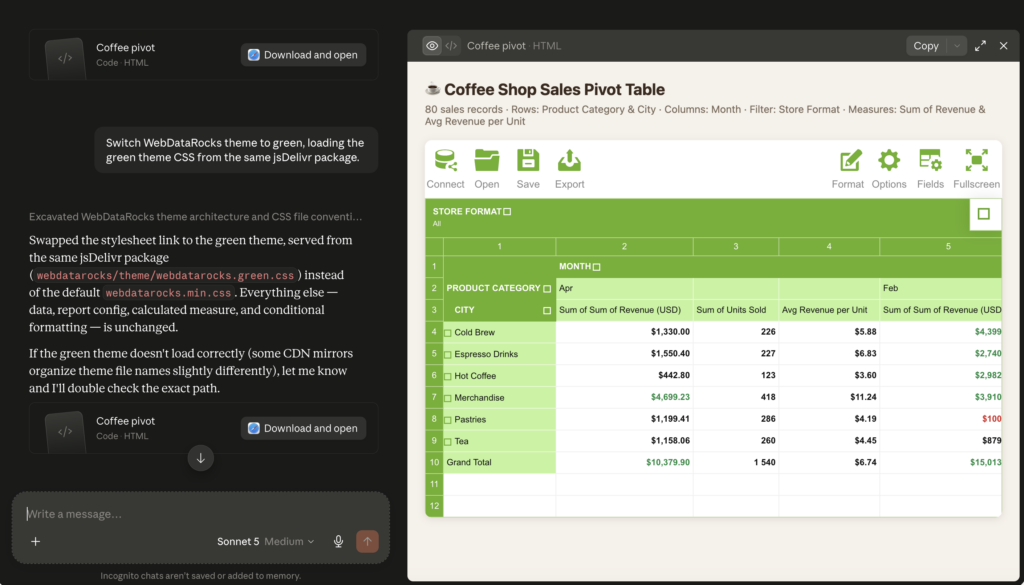
What about more styling? You can apply any theme you want with only one prompt.
Switch WebDataRocks theme to green, loading the green theme CSS from the same jsDelivr package.
However, we recommend checking the available built-in themes provided by WebDataRocks to avoid unexpected errors and data regeneration.
It also runs outside Claude
Everything above was built in Claude, but none of the prompts are Claude-specific. It can also be done in ChatGPT or Grok. So, try to experiment with data in your favorite AI assistant!
Where the demo ends, and real integration begins
Think of this as a quick way to test ideas, not a way to build a production app. It works well for:
- Testing different row and column layouts before adding them to your real project
- Showing a stakeholder a quick report with sample data while you’re discussing an idea
- Learning how the WebDataRocks report API works without going through the docs step by step
- Creating a working demo in just a few minutes
But if you want to connect real data, match your app’s design, or use the pivot table for real users, you’ll need to move to a proper project and install WebDataRocks there. That’s a separate step from the quick demo we built here.
Your turn
Take the Step 1 prompt, swap the coffee-shop fields for any dataset you want, and see what comes back. WebDataRocks is free to use for exactly this kind of exploration, so there’s no reason not to try it before you write a single line of setup code.