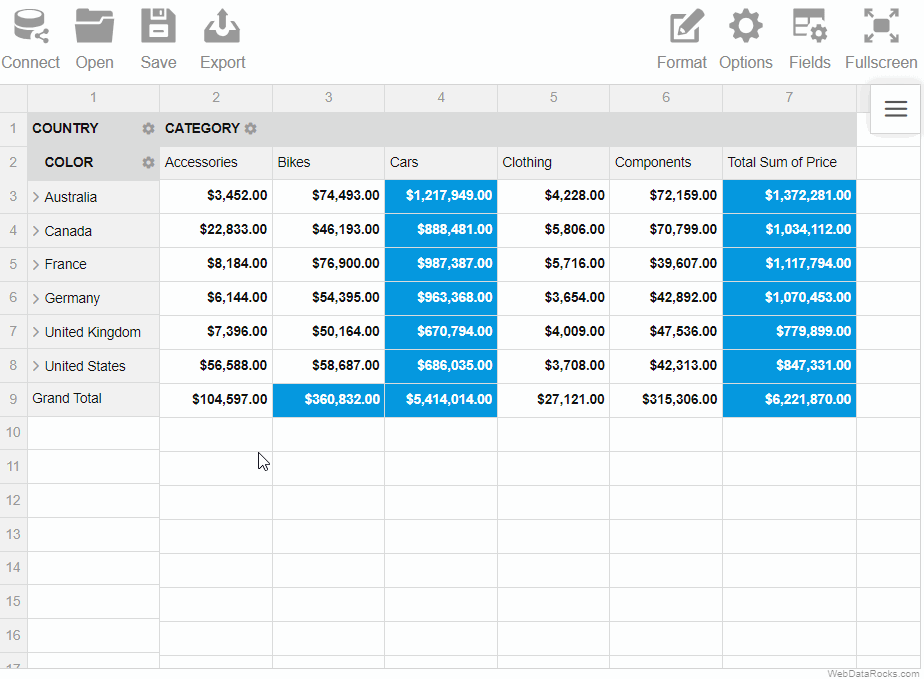
Saving the report
You can save your current report and load it later with all your settings: slice, formats, filters, sorting, conditions, and options.
To save the report via UI
- Click the Save button () on the Toolbar.
The report will be saved to your local file system in JSON format. Later you can open this report in WebDataRocks and see your previous configurations on the grid.
Here’s a demo showing how to save a report via the Toolbar:
To save the report programmatically
Use the save() method:
pivotRef.current.webdatarocks.save();
The saved report will contain only the configurations you’ve explicitly defined. To save the report with default or global configurations, see the next section.
Saving the report with default and global configurations
The save() method has parameters that allow you to save the report:
- With global configs
- With default configs
- With global and default configs
Now let’s have a look at each of these approaches in detail. For simplicity, we’ll focus on how options are saved, but data source and slice configs are saved similarly.
With default configs
How to save. Run the save() method with the withDefaults option:
pivotRef.current.webdatarocks.save({
  withDefaults: true
});
How it works. Let’s define the following report:
import React from "react";
import * as WebDataRocksReact from "@webdatarocks/react-webdatarocks";

export default function App() {
  const pivotRef = React.useRef(null);

  const reportJson = {
    dataSource: {
      filename: "https://cdn.flexmonster.com/data/data.json"
    },
    options: {
      grid: {
        type: "flat",
        showHeaders: false
      },
      configuratorActive: true
    }
  };

  return (
    <div>
      <WebDataRocksReact.Pivot
        ref={pivotRef}
        toolbar={true}
        report={reportJson}
      />
    </div>
  );
}
As you can see, we’ve defined only a few options in the report. Now if we save this report with default configs, we’ll see more options in the saved file:
{
 "dataSource": {
   // Data source configs
 },
 "slice": {
   // Slice configs
 },
 "options": {
   "grid": {
     "type": "flat",
     "title": "",
     "showFilter": true,
     "showHeaders": false,
     "showTotals": "on",
     "showGrandTotals": "on",
     // Other grid options
   },
   "configuratorActive": true,
   "configuratorButton": true,
   "showAggregations": true,
   "showCalculatedValuesButton": true,
   "drillThrough": true,
   "showDrillThroughConfigurator": true,
   // Other general options
 }
}
Notice that the options.grid.type, options.grid.showHeaders, and options.configuratorActive properties have values that we’ve set manually, whereas their default values are different — check them in the Options Object.
You can also check default values for the Slice Object and Data Source Object.
With global configs
How to save. Run the save() method with the withGlobals option:
pivotRef.current.webdatarocks.save({
  withGlobals: true
});
How it works. Let’s configure the component as follows:
import React from "react";
import * as WebDataRocksReact from "@webdatarocks/react-webdatarocks";

export default function App() {
  const pivotRef = React.useRef(null);

  const reportJson = {
    dataSource: {
      filename: "https://cdn.flexmonster.com/data/data.json"
    },
    options: {
      grid: {
        type: "classic"
      },
      configuratorActive: false
    }
  };

  const globalReportJson = {
    options: {
      grid: {
        type: "flat",
        showHeaders: false
      },
      configuratorActive: true
    }
  };

  return (
    <div>
      <WebDataRocksReact.Pivot
        ref={pivotRef}
        toolbar={true}
        report={reportJson}
        global={globalReportJson}
      />
    </div>
  );
}
We have defined global options, and some of them are overwritten in the report.
Now if we save this report with global configs, we’ll see the following options section in the saved file:
{
  "dataSource": {
    // Data source configs
  },
  "slice": {
    // Slice configs
  },
  "options": {
    "grid": {
      "type": "classic",
      "showHeaders": false
    }
  }
}
If we compare the initial configurations and the saved report, we’ll learn the following:
- If a configuration is defined globally and not defined in the report, the global value will be saved to the report (see the
grid.showHeadersoption in the example). - If a configuration is defined both globally and in the report, the global value is ignored (see the
grid.typeoption in the example). - If a global configuration is overwritten in the report, but its new value matches its default value, the configuration is not included in the saved report (see the
configuratorActiveoption in the example).
With default and global configs
How to save. Run the save() method with the withDefaults and withGlobals options:
pivotRef.current.webdatarocks.save({
  withDefaults: true,
  withGlobals: true
});
How it works. This approach is a combination of the previous approaches. For example, let’s save the following report with defaults and globals:
import React from "react";
import * as WebDataRocksReact from "@webdatarocks/react-webdatarocks";

export default function App() {
  const pivotRef = React.useRef(null);

  const reportJson = {
    dataSource: {
      filename: "https://cdn.flexmonster.com/data/data.json"
    },
    options: {
      grid: {
        type: "classic"
      },
      configuratorActive: false
    }
  };

  const globalReportJson = {
    options: {
      grid: {
        type: "flat",
        showHeaders: false
      },
      configuratorActive: true
    }
  };

  return (
    <div>
      <WebDataRocksReact.Pivot
        ref={pivotRef}
        toolbar={true}
        report={reportJson}
        global={globalReportJson}
      />
    </div>
  );
}
The saved file will look similar to the following:
{
  "dataSource": {
    // Data source configs
  },
  "slice": {
    // Slice configs
  },
  "options": {
    "grid": {
      "type": "classic",
      "title": "",
      "showFilter": true,
      "showHeaders": false,
      "showTotals": "on",
      "showGrandTotals": "on",
      // Other grid options
    },
    "configuratorActive": false,
    "configuratorButton": true,
    "showAggregations": true,
    "showCalculatedValuesButton": true,
    "drillThrough": true,
    "showDrillThroughConfigurator": true,
    // Other general options
  }
}
As you can see from the saved report:
- The
grid.showHeadersoption is not overwritten in the report, so it has its global value (false). - The
grid.typeoption is overwritten in the report, so its global value is ignored (grid.typeis"classic", not"flat"). - All other options have their default values, thanks to the
withDefaults: true.
See also
If you want to pick up where you left while working with the previous report, you can load it into the pivot table:
Loading the report via the Toolbar
To load a local report
- Go to the Open tab () on the Toolbar.
- Select Local report.

To load a remote report
- Go to the Open tab () on the Toolbar.
- Select Remote report.
- Enter the URL of the remote report.

Loading the report programmatically
Load your report while embedding WebDataRocks by specifying a path to your report file:
import React from "react";
import * as WebDataRocksReact from "@webdatarocks/react-webdatarocks";

export default function App() {
  return (
    <div>
      <WebDataRocksReact.Pivot
        toolbar={true}
        report="https://cdn.webdatarocks.com/reports/report.json"
      />
    </div>
  );
}

export default App;
After formatting your JSON data and setting data types for fields, you can start connecting to the data.
Connect to JSON via UI
Step 1. Go to the Connect tab () on the Toolbar.
Step 2. Choose the JSON you want to connect to:
- Local JSON. Use this option to load a file from your local file system.
- Remote JSON. Use this option to load a remote JSON file by its URL or data returned by a server-side script.
Connect to JSON programmatically
There are two ways to connect to JSON programmatically:
1) To connect to inline JSON data in the report, use the dataSource.data property:
<script setup>
  import {Pivot} from "@webdatarocks/vue-webdatarocks";
  import "@webdatarocks/webdatarocks/webdatarocks.css";

  const reportJson = {
    dataSource: {
      data: [
        {
          "Product": "Apple",
          "Price": 2.50
        },
        {
          "Product": "Cherry",
          "Price": 5.25
        }
      ]
    }
  };
</script>

<template>
  <div>
    <Pivot
      v-bind:report="reportJson"
      toolbar
    />
  </div>
</template>
2) If your JSON data is in a file or is returned by a server-side script, specify the URL in the dataSource.filename property:
<script setup>
  import {Pivot} from "@webdatarocks/vue-webdatarocks";
  import "@webdatarocks/webdatarocks/webdatarocks.css";

  const reportJson = {
    dataSource: {
      filename: "URL-to-your-JSON-file"
    }
  };
</script>

<template>
  <div>
    <Pivot
      v-bind:report="reportJson"
      toolbar
    />
  </div>
</template>
Set a JSON data source for all reports
To set a JSON data source for all reports, specify it in the Global Object:
import { Component } from "@angular/core";
import { WebdatarocksPivotModule } from "@webdatarocks/ngx-webdatarocks"

@Component({
  selector: "app-root",
  standalone: true,
  imports: [WebdatarocksPivotModule],
  templateUrl: "./app.component.html",
  styleUrls: ["./app.component.css"]
})
export class AppComponent {
  globalReportJson = {
    dataSource: {
      type: "json",
      filename: "URL-to-your-JSON-file"
    }
  };

  reportJson = {
    // Your report
  };
}
<app-wbr-pivot
 [toolbar]="true"
 [global]="globalReportJson"
 [report]="reportJson">
</app-wbr-pivot>
<script setup>
  import {Pivot} from "@webdatarocks/vue-webdatarocks";
  import "@webdatarocks/webdatarocks/webdatarocks.css";

  const globalReportJson = {
    dataSource: {
      type: "json",
      filename: "URL-to-your-JSON-file"
    }
  };
  const reportJson = {
    // Your report
  };
</script>

<template>
  <div>
    <Pivot
      v-bind:global="globalReportJson"
      v-bind:report="reportJson"
      toolbar
    />
  </div>
</template>
See also
- Supported JSON formats
- Setting data types
- Creating multilevel hierarchies in JSON
- Metadata object for JSON
After formatting your JSON data and setting data types for fields, you can start connecting to the data.
Connect to JSON via UI
Step 1. Go to the Connect tab () on the Toolbar.
Step 2. Choose the JSON you want to connect to:
- Local JSON. Use this option to load a file from your local file system.
- Remote JSON. Use this option to load a remote JSON file by its URL or data returned by a server-side script.
Connect to JSON programmatically
There are two ways to connect to JSON programmatically:
1) To connect to inline JSON data in the report, use the dataSource.data property:
import { Component } from "@angular/core";
import { WebdatarocksPivotModule } from "@webdatarocks/ngx-webdatarocks";

@Component({
  selector: "app-root",
  standalone: true,
  imports: [WebdatarocksPivotModule],
  templateUrl: "./app.component.html",
  styleUrls: ["./app.component.css"]
})
export class AppComponent {
  reportJson = {
   dataSource: {
     data: [
       {
         "Product": "Apple",
         "Price": 2.50
       },
       {
         "Product": "Cherry",
         "Price": 5.25
       }
     ]
   }
 };
}
<app-wbr-pivot
 [toolbar]="true"
 [report]="reportJson">
</app-wbr-pivot>
2) If your JSON data is in a file or is returned by a server-side script, specify the URL in the dataSource.filename property:
import { Component } from "@angular/core";
import { WebdatarocksPivotModule } from "@webdatarocks/ngx-webdatarocks";

@Component({
  selector: "app-root",
  standalone: true,
  imports: [WebdatarocksPivotModule],
  templateUrl: "./app.component.html",
  styleUrls: ["./app.component.css"]
})
export class AppComponent {
  reportJson = {
   dataSource: {
     filename: "URL-to-your-JSON-file"
   }
 };
}
<app-wbr-pivot
 [toolbar]="true"
 [report]="reportJson">
</app-wbr-pivot>
Set a JSON data source for all reports
To set a JSON data source for all reports, specify it in the Global Object:
import { Component } from "@angular/core";
import { WebdatarocksPivotModule } from "@webdatarocks/ngx-webdatarocks"

@Component({
  selector: "app-root",
  standalone: true,
  imports: [WebdatarocksPivotModule],
  templateUrl: "./app.component.html",
  styleUrls: ["./app.component.css"]
})
export class AppComponent {
  globalReportJson = {
    dataSource: {
      type: "json",
      filename: "URL-to-your-JSON-file"
    }
  };

  reportJson = {
    // Your report
  };
}
<app-wbr-pivot
 [toolbar]="true"
 [global]="globalReportJson"
 [report]="reportJson">
</app-wbr-pivot>
See also
- Supported JSON formats
- Setting data types
- Creating multilevel hierarchies in JSON
- Metadata object for JSON
After formatting your JSON data and setting data types for fields, you can start connecting to the data.
Connect to JSON via UI
Step 1. Go to the Connect tab () on the Toolbar.
Step 2. Choose the JSON you want to connect to:
- Local JSON. Use this option to load a file from your local file system.
- Remote JSON. Use this option to load a remote JSON file by its URL or data returned by a server-side script.
Connect to JSON programmatically
There are two ways to connect to JSON programmatically:
1) To connect to inline JSON data in the report, use the dataSource.data property:
import React from "react";
import * as WebDataRocksReact from "@webdatarocks/react-webdatarocks";

export default function App() {
  const reportJson = {
    dataSource: {
      data: [
        {
          "Product": "Apple",
          "Price": 2.50
        },
        {
          "Product": "Cherry",
          "Price": 5.25
        }
      ]
    }
  };

  return (
    <div>
      <WebDataRocksReact.Pivot
        toolbar={true}
        report={reportJson}
      />
    </div>
  );
}
2) If your JSON data is in a file or is returned by a server-side script, specify the URL in the dataSource.filename property:
import React from "react";
import * as WebDataRocksReact from "@webdatarocks/react-webdatarocks";

export default function App() {
  const reportJson = {
    dataSource: {
      filename: "URL-to-your-JSON-file"
    }
  };

  return (
    <div>
      <WebDataRocksReact.Pivot
        toolbar={true}
        report={reportJson}
      />
    </div>
  );
}
Set a JSON data source for all reports
To set a JSON data source for all reports, specify it in the Global Object:
import { Component } from "@angular/core";
import { WebdatarocksPivotModule } from "@webdatarocks/ngx-webdatarocks"

@Component({
  selector: "app-root",
  standalone: true,
  imports: [WebdatarocksPivotModule],
  templateUrl: "./app.component.html",
  styleUrls: ["./app.component.css"]
})
export class AppComponent {
  globalReportJson = {
    dataSource: {
      type: "json",
      filename: "URL-to-your-JSON-file"
    }
  };

  reportJson = {
    // Your report
  };
}
<app-wbr-pivot
 [toolbar]="true"
 [global]="globalReportJson"
 [report]="reportJson">
</app-wbr-pivot>
import React from "react";
import * as WebDataRocksReact from "@webdatarocks/react-webdatarocks";

export default function App() {
  const globalReportJson = {
    dataSource: {
      type: "json",
      filename: "URL-to-your-JSON-file"
    }
  };

  const reportJson = {
    // Your report
  };

  return (
    <div>
      <WebDataRocksReact.Pivot
        toolbar={true}
        global={globalReportJson}
        report={reportJson}
      />
    </div>
  );
}
See also
- Supported JSON formats
- Setting data types
- Creating multilevel hierarchies in JSON
- Metadata object for JSON
After formatting your CSV data and setting data types for fields, you can start connecting to the data.
Connect to CSV via UI
Step 1. Go to the Connect tab () on the Toolbar.
Step 2. Choose the CSV you want to connect to:
- Local CSV. Use this option to load a file from your local file system.
- Remote CSV. Use this option to load a remote file by its URL or data returned by a server-side script.
Here’s an example of connecting to a remote CSV file:
Connect to CSV programmatically
To load your remote CSV data (a remote CSV file or data returned by a server-side script), specify the URL in the dataSource.filename property:
<script setup>
  import {Pivot} from "@webdatarocks/vue-webdatarocks";
  import "@webdatarocks/webdatarocks/webdatarocks.css";

  const reportCsv = {
    dataSource: {
      filename: "URL-to-your-CSV-file"
    }
  };
</script>

<template>
  <div>
    <Pivot
      v-bind:report="reportCsv"
      toolbar
    />
  </div>
</template>
Specify a custom field separator
By default, WebDataRocks supports a comma , or a semicolon ; as a field separator. If fields in your data are separated by another character, e.g., a colon :, you need to specify this character in the dataSource.fieldSeparator property. For example:
const reportCsv = {
  dataSource: {
    filename: "URL-to-your-CSV-file",
    fieldSeparator: ":"
  }
};
Set a CSV data source for all reports
To set a CSV data source for all reports, specify it in the Global Object:
<script setup>
  import {Pivot} from "@webdatarocks/vue-webdatarocks";
  import "@webdatarocks/webdatarocks/webdatarocks.css";

  const globalReportCsv = {
    dataSource: {
      type: "csv",
      filename: "URL-to-your-CSV-file"
    }
  };
  const reportCsv = {
    // Your report
  };
</script>

<template>
  <div>
    <Pivot
      v-bind:global="globalReportCsv"
      v-bind:report="reportCsv"
      toolbar
    />
  </div>
</template>
See also
After formatting your CSV data and setting data types for fields, you can start connecting to the data.
Connect to CSV via UI
Step 1. Go to the Connect tab () on the Toolbar.
Step 2. Choose the CSV you want to connect to:
- Local CSV. Use this option to load a file from your local file system.
- Remote CSV. Use this option to load a remote file by its URL or data returned by a server-side script.
Here’s an example of connecting to a remote CSV file:
Connect to CSV programmatically
To load your remote CSV data (a remote CSV file or data returned by a server-side script), specify the URL in the dataSource.filename property:
import { Component } from "@angular/core";
import { WebdatarocksPivotModule } from "@webdatarocks/ngx-webdatarocks";

@Component({
  selector: "app-root",
  standalone: true,
  imports: [WebdatarocksPivotModule],
  templateUrl: "./app.component.html",
  styleUrls: ["./app.component.css"]
})
export class AppComponent {
  reportCsv = {
   dataSource: {
     filename: "URL-to-your-CSV-file"
   }
 };
}
<app-wbr-pivot
 [toolbar]="true"
 [report]="reportCsv">
</app-wbr-pivot>
Specify a custom field separator
By default, WebDataRocks supports a comma , or a semicolon ; as a field separator. If fields in your data are separated by another character, e.g., a colon :, you need to specify this character in the dataSource.fieldSeparator property. For example:
reportCsv = {
  dataSource: {
    filename: "URL-to-your-CSV-file",
    fieldSeparator: ":"
  }
};
Set a CSV data source for all reports
To set a CSV data source for all reports, specify it in the Global Object:
import { Component } from "@angular/core";
import { WebdatarocksPivotModule } from "@webdatarocks/ngx-webdatarocks";

@Component({
  selector: "app-root",
  standalone: true,
  imports: [WebdatarocksPivotModule],
  templateUrl: "./app.component.html",
  styleUrls: ["./app.component.css"]
})
export class AppComponent {
  globalReportCsv = {
   dataSource: {
    type: "csv",
    filename: "URL-to-your-CSV-file"
   }
  };
  reportCsv = {
   // Your report
  };
}
<app-wbr-pivot
 [toolbar]="true"
 [global]="globalReportCsv"
 [report]="reportCsv"
>
</app-wbr-pivot>
See also
After formatting your CSV data and setting data types for fields, you can start connecting to the data.
Connect to CSV via UI
Step 1. Go to the Connect tab () on the Toolbar.
Step 2. Choose the CSV you want to connect to:
- Local CSV. Use this option to load a file from your local file system.
- Remote CSV. Use this option to load a remote file by its URL or data returned by a server-side script.
Here’s an example of connecting to a remote CSV file:
Connect to CSV programmatically
To load your remote CSV data (a remote CSV file or data returned by a server-side script), specify the URL in the dataSource.filename property:
import React from "react";
import * as WebDataRocksReact from "@webdatarocks/react-webdatarocks";

export default function App() {
  const reportCsv = {
    dataSource: {
      filename: "URL-to-your-CSV-file"
    }
  };

  return (
    <div>
      <WebDataRocksReact.Pivot
        toolbar={true}
        report={reportCsv}
      />
    </div>
  );
}
Specify a custom field separator
By default, WebDataRocks supports a comma , or a semicolon ; as a field separator. If fields in your data are separated by another character, e.g., a colon :, you need to specify this character in the dataSource.fieldSeparator property. For example:
const reportCsv = {
  dataSource: {
    filename: "URL-to-your-CSV-file",
    fieldSeparator: ":"
  }
};
Set a CSV data source for all reports
To set a CSV data source for all reports, specify it in the Global Object:
import React from "react";
import * as WebDataRocksReact from "@webdatarocks/react-webdatarocks";

export default function App() {
  const globalReportCsv = {
    dataSource: {
      type: "csv",
      filename: "URL-to-your-CSV-file"
    }
  };

  const reportCsv = {
    // Your report
  };

  return (
    <div>
      <WebDataRocksReact.Pivot
        toolbar={true}
        global={globalReportCsv}
        report={reportCsv}
      />
    </div>
  );
}
See also
This article explains how to define which data is shown on the grid using the Field List. Each field can be selected to rows, columns, values, or report filters.
To select the fields in the Field List
- Go to the Fields tab () on the Toolbar.
- Pay attention to the All Fields section on the left. It contains all fields from your data source.
- Drag and drop the fields to the Rows, Columns, Values, and Report Filters areas.
- To change the aggregation for a field in the Values box, press the Edit button (
 ) next to its name.
 - Use the Add calculated value button to compose new values based on your data source.
- Click the APPLY button to close the Field List and see the changes on the grid.
Try it yourself:
To show certain fields when loading data
- Configure your fields using the Field List.
- Save your current configuration and apply it when loading a new report. For more details, see Loading the report.
Want to check how is the field configuration defined in the report? Find the slice section in our online demo.
See also
This article explains how to define which data is shown on the grid using the Field List. Each field can be selected to rows, columns, values, or report filters.
To select the fields in the Field List
- Go to the Fields tab () on the Toolbar.
- Pay attention to the All Fields section on the left. It contains all fields from your data source.
- Drag and drop the fields to the Rows, Columns, Values, and Report Filters areas.
- To change the aggregation for a field in the Values box, press the Edit button () next to its name.
- Use the Add calculated value button to compose new values based on your data source.
- Click the APPLY button to close the Field List and see the changes on the grid.
Try it yourself:
To show certain fields when loading data
- Configure your fields using the Field List.
- Save your current configuration and apply it when loading a new report. For more details, see Loading the report.
Want to check how is the field configuration defined in the report? Find the slice section in our online demo.