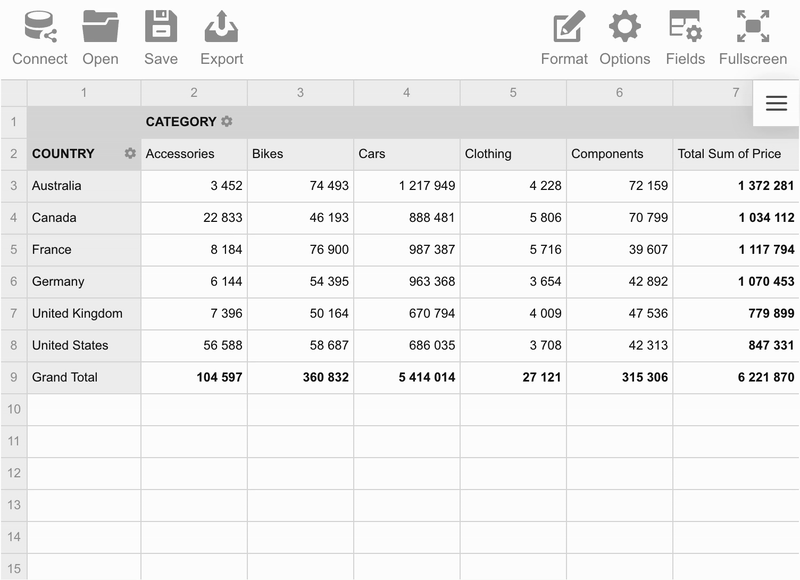
Aggregation functions
Aggregation functions group together values from multiple fields to form a single compound value. To choose an aggregation function for a value, use the Field List.
WebDataRocks Pivot Table offers 17 aggregation functions, which you can apply to the measures in your report:
| Name | Value | Description |
|---|---|---|
| Sum | "sum" | Adds all values in the row/column |
| Count | "count" | Counts the number of the rows/columns that contain values |
| Distinct Count | "distinctcount" | Counts the number of the rows/columns that contain unique values |
| Average | "average" | Returns the average (arithmetic mean) of the values in the row/column |
| Median | "median" | Returns the median of the values in the row/column |
| Product | "product" | Multiplies the values in the row/column |
| Min | "min" | Returns the smallest number in the row/column |
| Max | "max" | Returns the largest value in the row/column |
| % of Grand Total | "percent" | Calculates the values distribution across grand totals in the report |
| % of Column | "percentofcolumn" | Calculates the percent distribution across the columns |
| % of Row | "percentofrow" | Calculates the percent distribution across the rows |
| Index | "index" | Calculates the aggregated weighted average to reveal the impact of each value within the context of a dataset |
| Difference | "difference" | Calculates the difference between two values in the row/column |
| % Difference | "%difference" | Calculates the difference between two values in the row/column expressed in percentages |
| Population Standard Deviation | "stdevp" | Calculates population standard deviation of the values in the row/column |
| Sample Standard Deviation | "stdevs" | Calculates sample standard deviation of the values in the row/column |
| Running Totals | "runningtotals" | Calculates running totals (cumulative sum) |
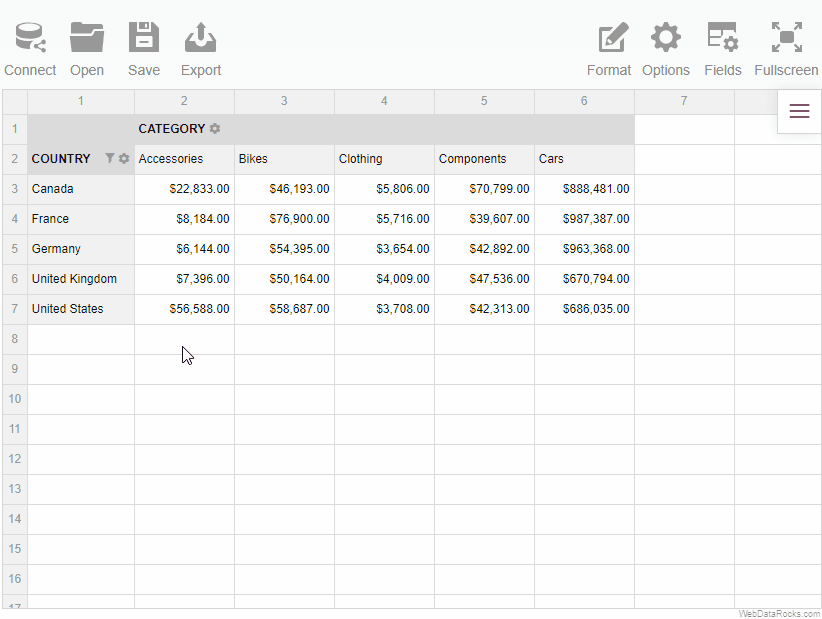
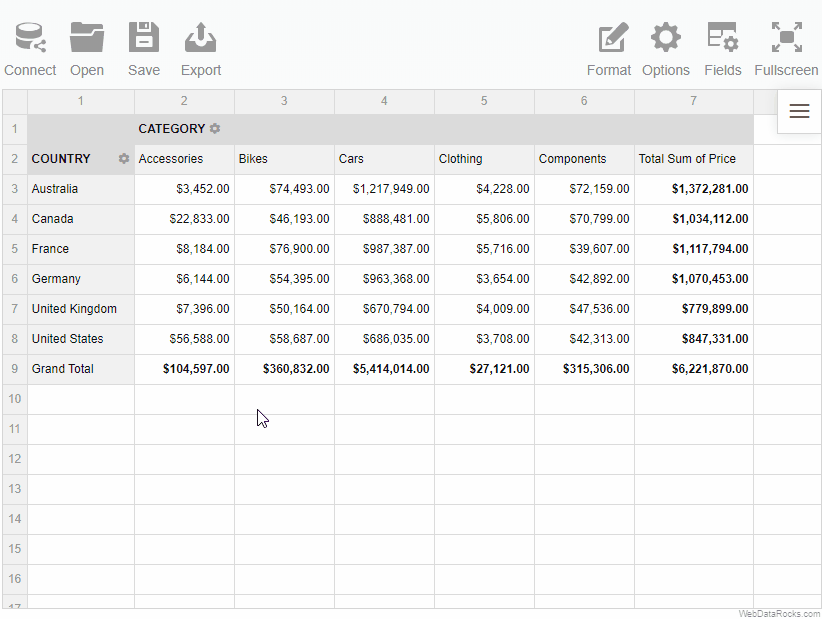
To see the most relevant information first, apply sorting to the field members or values on the grid.
Sorting in the pivot table
In the pivot table, you can sort by values and by members.
Sorting by values
To sort by values in the pivot table:
- Hover over a member name or a total cell and click the arrow icon that appears to sort the records descending.
- Click again to sort ascending.
To remove sorting by values:
- Right-click the member name to open the context menu.
- Select the Clear sorting option.
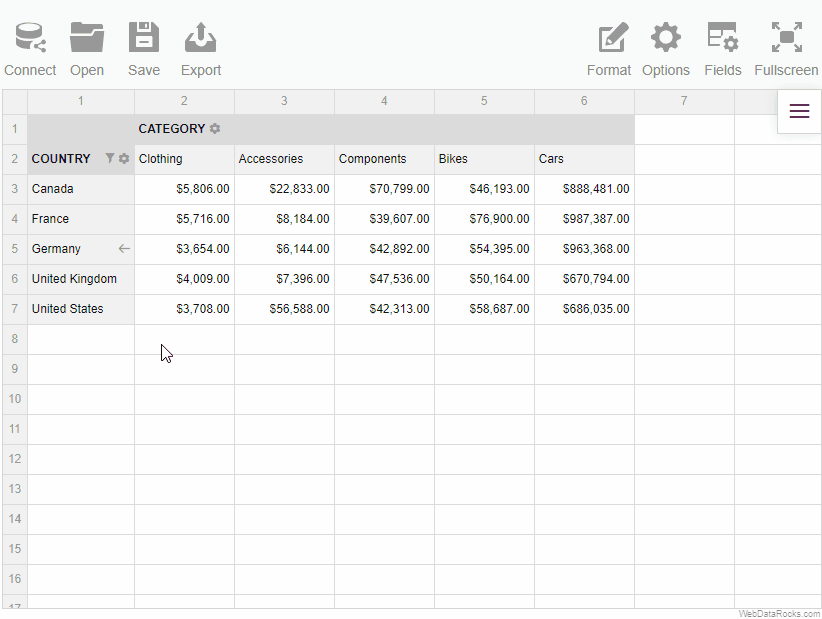
Sorting by members
To sort members on the grid:
- Open the field config pop-up window by clicking the gear icon () near the field caption.
- Choose the ascending or descending order using sorting controls. By default, members are sorted in ascending (AZ) order.
- Click the APPLY button to close the field config pop-up window and see the sorted members on the grid.
To remove sorting by members:
- Open the field config pop-up window by clicking the gear icon () near the field caption.
- Deselect an active sorting control to display the members unsorted (i.e., in the same order as they come inside the data source).
- Сlick the APPLY button to close the field config pop-up window and see the result.

Sorting in the flat view
In the flat view, you can sort by values:
- Hover over a field name and click the arrow icon that appears to sort the records descending.
- Click again to sort ascending.
To see the most relevant information first, apply sorting to the field members or values on the grid.
Sorting in the pivot table
In the pivot table, you can sort by values and by members.
Sorting by values
To sort by values in the pivot table:
- Hover over a member name or a total cell and click the arrow icon that appears to sort the records descending.
- Click again to sort ascending.
To remove sorting by values:
- Right-click the member name to open the context menu.
- Select the Clear sorting option.
Sorting by members
To sort members on the grid:
- Open the field config pop-up window by clicking the gear icon () near the field caption.
- Choose the ascending or descending order using sorting controls. By default, members are sorted in ascending (AZ) order.
- Click the APPLY button to close the field config pop-up window and see the sorted members on the grid.
To remove sorting by members:
- Open the field config pop-up window by clicking the gear icon () near the field caption.
- Deselect an active sorting control to display the members unsorted (i.e., in the same order as they come inside the data source).
- Сlick the APPLY button to close the field config pop-up window and see the result.
Sorting in the flat view
In the flat view, you can sort by values:
- Hover over a field name and click the arrow icon that appears to sort the records descending.
- Click again to sort ascending.
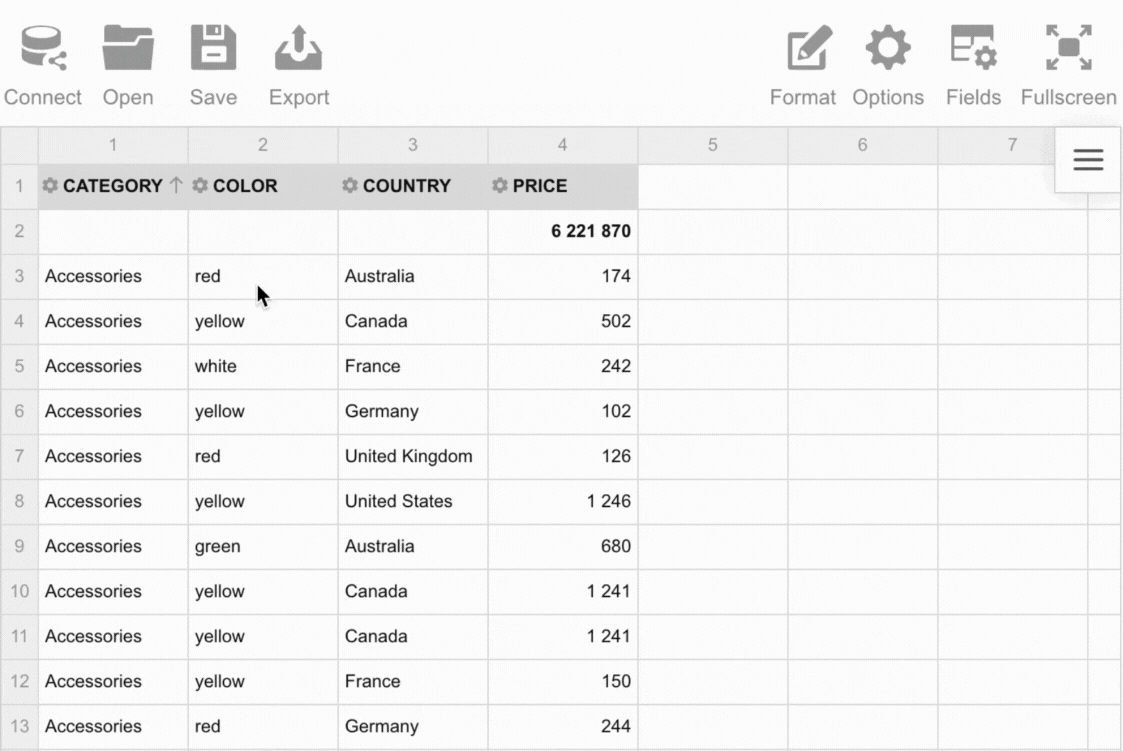
Use the filtering feature to focus on the important subsets of your data and display only those rows and columns that satisfy certain conditions.
WebDataRocks supports three types of filters:
- Filtering by member names. Use it to show the values of the specific members.
- Filtering by values, also known as the Top/Bottom X filter. Use it to keep records within a specified range (with values higher or lower than a specified number).
- A report filter. Use it to apply filtering to the entire report.
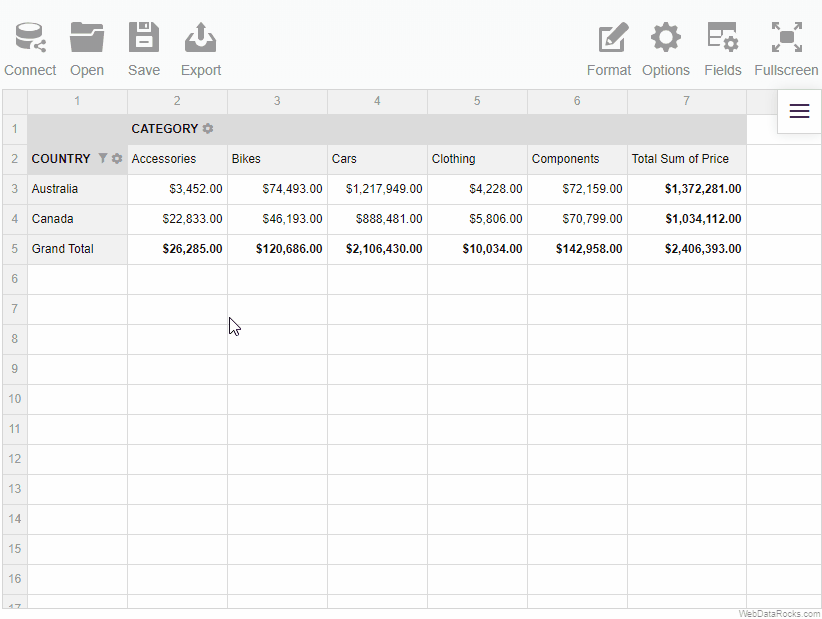
To apply a filter by member names
- Open the field config pop-up window by clicking the gear icon () near the field caption.
- Select the members to be displayed or deselect them to be hidden from the grid.
- To close the field config pop-up window and see the changes, click the APPLY button.
If you have a large list of hierarchy members, use the search option:
- Start typing the member’s caption in the search box.
- Select the check box of the member you are searching for.
- Click the APPLY button to see the filtered data.
To apply a filter by value
- Open the field config pop-up window by clicking the gear icon () near the field caption.
- Select the Top 10 button.
- Select the Top or Bottom button to show the results with the lowest or the highest values, respectively.
- Enter the number of top or bottom results to show.
- Select the measure on which the filtering is based.
- Click the APPLY button to close the field config pop-up window and see the filtered data.
To apply a report filter
- Go to the Fields () tab.
- Drag the fields to the Report Filters area.
- Click APPLY to add report filters and close the Field List.
The separate tabs of the report filters appear above the grid. Click on them and choose the members based on which the data on the grid will be filtered. Then, click the APPLY button to apply the filters to the report.
Use the filtering feature to focus on the important subsets of your data and display only those rows and columns that satisfy certain conditions.
WebDataRocks supports three types of filters:
- Filtering by member names. Use it to show the values of the specific members.
- Filtering by values, also known as the Top/Bottom X filter. Use it to keep records within a specified range (with values higher or lower than a specified number).
- A report filter. Use it to apply filtering to the entire report.
To apply a filter by member names
- Open the field config pop-up window by clicking the gear icon () near the field caption.
- Select the members to be displayed or deselect them to be hidden from the grid.
- To close the field config pop-up window and see the changes, click the APPLY button.
If you have a large list of hierarchy members, use the search option:
- Start typing the member’s caption in the search box.
- Select the check box of the member you are searching for.
- Click the APPLY button to see the filtered data.
To apply a filter by value
- Open the field config pop-up window by clicking the gear icon () near the field caption.
- Select the Top 10 button.
- Select the Top or Bottom button to show the results with the lowest or the highest values, respectively.
- Enter the number of top or bottom results to show.
- Select the measure on which the filtering is based.
- Click the APPLY button to close the field config pop-up window and see the filtered data.
To apply a report filter
- Go to the Fields () tab.
- Drag the fields to the Report Filters area.
- Click APPLY to add report filters and close the Field List.
The separate tabs of the report filters appear above the grid. Click on them and choose the members based on which the data on the grid will be filtered. Then, click the APPLY button to apply the filters to the report.
WebDataRocks offers customization of the pivot table.
It’s useful if you want to enhance the Look & Feel of your web reporting tool and make the visitors’ interaction with your website a more pleasant experience.
WebDataRocks goes with a set of eight predefined themes:
- Dark
- Default
- Light blue
- Orange
- Teal
- Green
- Striped-Blue
- Striped-Teal
How to change the theme
Step 1. Include the CSS file
All files with themes are located in webdatarocks/theme/ folder. If you don’t specify a theme, a component will use the default one.
Open the file where WebDataRocks is imported (e.g., src/App.vue). Include a CSS file of the theme you like.
In our sample, we’ve chosen the Light blue theme:
import "@webdatarocks/webdatarocks/theme/lightblue/webdatarocks.css";
In case you want to create a custom theme, turn to the detailed tutorial on custom report themes.
Step 2. Update the webpage
Save the applied results and reload the page to see how your pivot table looks now.
Example
Applying the Light blue theme to the pivot table:
See also
WebDataRocks offers customization of the pivot table.
It’s useful if you want to enhance the Look & Feel of your web reporting tool and make the visitors’ interaction with your website a more pleasant experience.
WebDataRocks goes with a set of eight predefined themes:
- Dark
- Default
- Light blue
- Orange
- Teal
- Green
- Striped-Blue
- Striped-Teal
How to change the theme
Step 1. Include the CSS file
All files with themes are located in webdatarocks/theme/ folder. If you don’t specify a theme, a component will use the default one.
Open the CSS file with WebDataRocks styles (e.g., src/styles.css). Include a CSS file of the theme you like.
In our sample, we’ve chosen the Light blue theme:
@import "@webdatarocks/webdatarocks/theme/lightblue/webdatarocks.css";
In case you want to create a custom theme, turn to the detailed tutorial on custom report themes.
Step 2. Update the webpage
Save the applied results and reload the page to see how your pivot table looks now.
Example
Applying the Light blue theme to the pivot table:
See also
WebDataRocks offers customization of the pivot table.
It’s useful if you want to enhance the Look & Feel of your web reporting tool and make the visitors’ interaction with your website a more pleasant experience.
WebDataRocks goes with a set of eight predefined themes:
- Dark
- Default
- Light blue
- Orange
- Teal
- Green
- Striped-Blue
- Striped-Teal
How to change the theme
Step 1. Include the CSS file
All files with themes are located in webdatarocks/theme/ folder. If you don’t specify a theme, a component will use the default one.
Open the CSS file with WebDataRocks styles (e.g., src/index.css). Include a CSS file of the theme you like.
In our sample, we’ve chosen the Light blue theme:
@import "@webdatarocks/webdatarocks/theme/lightblue/webdatarocks.css";
In case you want to create a custom theme, turn to the detailed tutorial on custom report themes.
Step 2. Update the webpage
Save the applied results and reload the page to see how your pivot table looks now.
Example
Applying the Light blue theme to the pivot table: